Documentation

This category contains articles relating to setup and configuration of our different products and services.

Signatures in Tuxedo Webmail

When using webmail, you may want to have a signature automatically append to your messages.  These are the instructions for accessing/managing signatures in the Tuxedo Webmail,


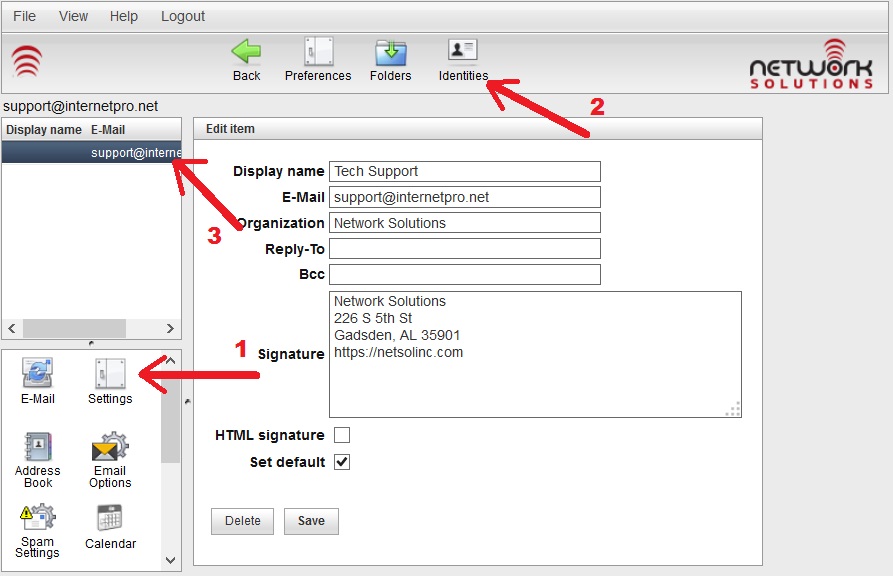
To access your signature and set or change it follow these steps as shown in the screenshot below:
	1 - click on Settings on the bottom left
	2 - click on Identities at the top center of the screen.
	3 - click on your email address on the top left
Signature1


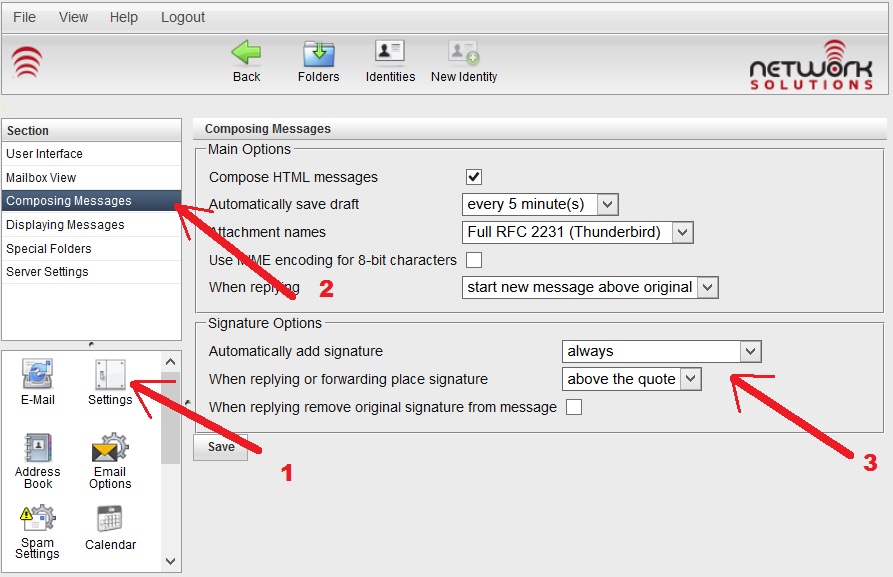
To set when your signature is used, follow these steps as shown in the screenshot below:
	1 - click on Settings on the bottom left
	2 - click on Composing Messages
	3 - set when you want your signature to be used
Signature2
2014-12-11T17:33:35-06:00December 11, 2014|Documentation|Comments Off on Signatures in Tuxedo Webmail

Whitelisting Emails in Webmail Lite

This documentation only applies if you are using the Normal with Quarantine template for spam filtering.  If you are using other templates, your spam messages will not be quarantined in the spam folder.
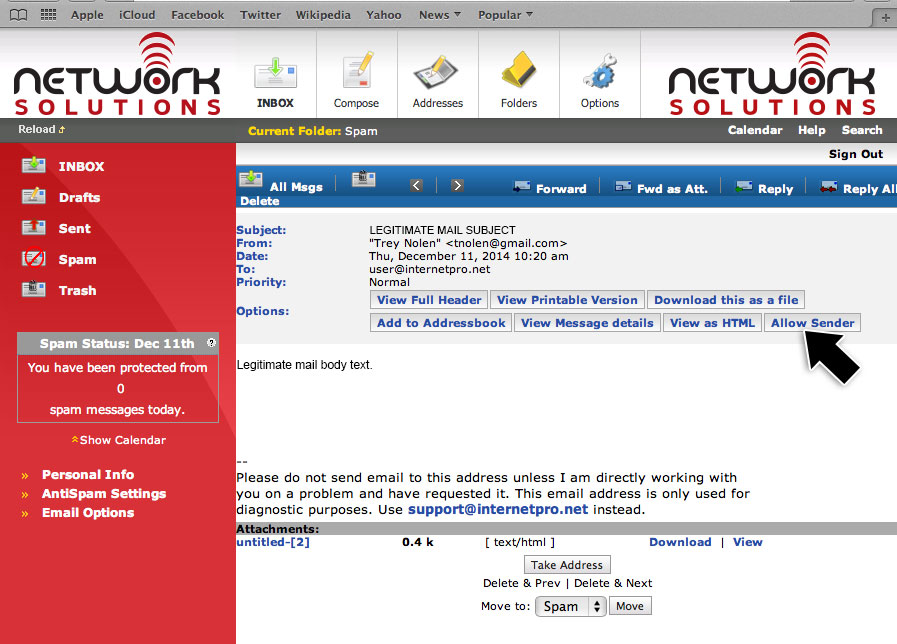
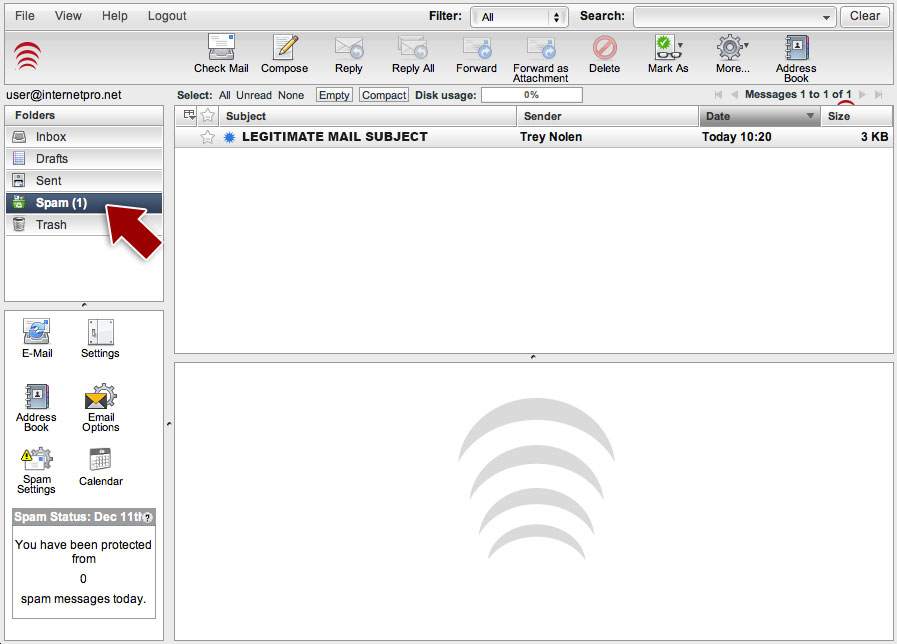
To add quarantined senders to your whitelist in Webmail Lite follow these steps:

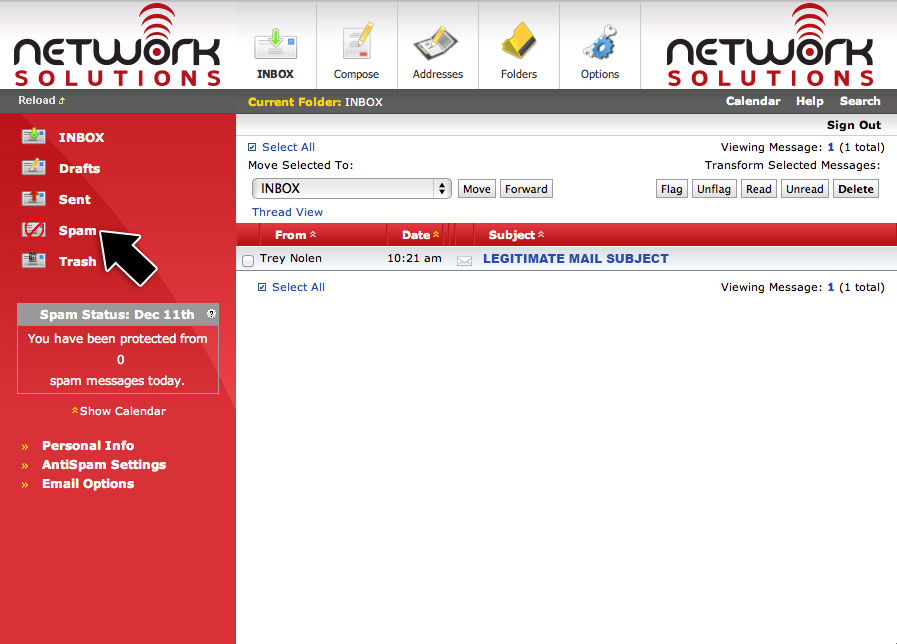
1) First, click the spam folder to show a list of messages which have been quarantined as spam.

legitimate-webmail


2)  Click the legitimate email to view it.   Above the body of the email, you will see an “Allow Sender” button as in the screenshot below.  Click that button.

legitimate-webmail2


That’s it!   The email will automatically be moved from the spam folder and back to your Inbox.  The sender of the email will be added to your personal whitelist, so that sender’s email will never be quarantined or blocked as spam again!


2014-12-11T19:56:51-06:00December 11, 2014|Documentation|Comments Off on Whitelisting Emails in Webmail Lite

Whitelisting Emails in Tuxedo

This documentation only applies if you are using the Normal with Quarantine template for spam filtering.  If you are using other templates, your spam messages will not be quarantined in the spam folder.
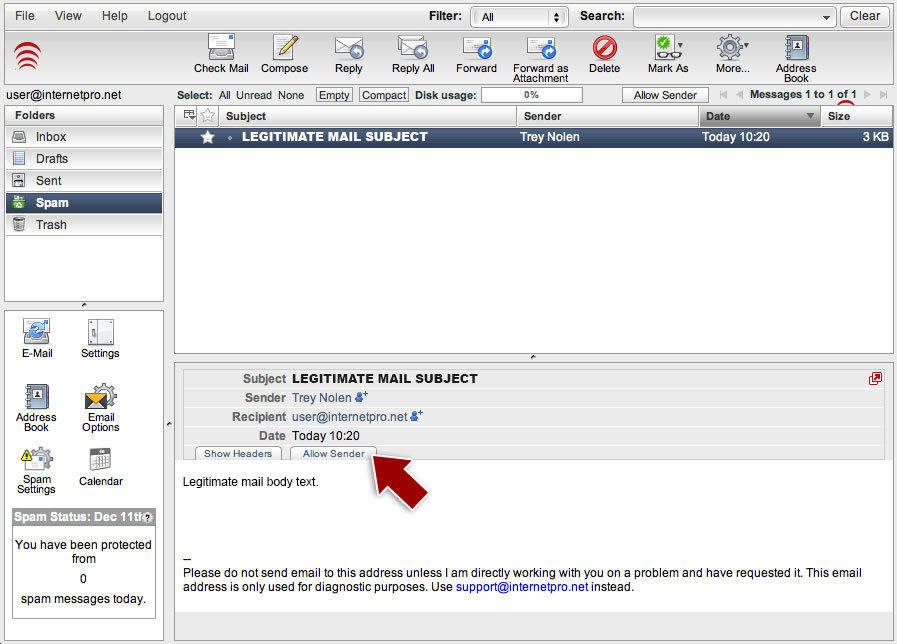
To add quarantined senders to your whitelist using the Tuxedo webmail, follow these steps:

1) First, click the spam folder to show a list of messages which have been quarantined as spam.

legitimate


2)  Click the legitimate email to view it.   Above the body of the email, you will see an “Allow Sender” tab as in the screenshot below.  Click that link.

legitimate2


That’s it!   The email will automatically be moved from the spam folder and back to your Inbox.  The sender of the email will be added to your personal whitelist, so that sender’s email will never be quarantined or blocked as spam again!

2014-12-11T19:57:41-06:00December 11, 2014|Documentation|Comments Off on Whitelisting Emails in Tuxedo

New Email System

We are bringing the new email system online around 11:00am CST on 12/9/2014.   We are bringing it online during the day instead of during a maintenance window so that we can better troubleshoot issues while people are using their email instead of possibly missing messages in the middle of the night when people aren’t using the system.    Also, we’ll have a full staff available to address any problems which may arise.

Fundamental Change in Dealing with SPAM

The new system brings with it a fundamental change to the way we deal with spam.   In the past, we have tagged messages our system thought were spam with *****SPAM***** in the subject line.   The idea was to leave filtering of the spam to the end user.   However, as global spam volume has increased, people are wanting to just not see spam at all.  Also, devices such as phones and tablets have become more prevalent and those devices generally don’t have good filtering capabilities built in.   So, the new system will concentrate on just keeping spam out of your inbox completely.   Spam messages will now be rejected back to sender by default.

What This Means to You

You will now be able to maintain your own “whitelist” (list of email addresses whose email you always receive) and “blacklist” (list of email addresses you always block).  Using these lists, you will be able to “tweak” your Inbox so that you receive very little spam.   We are also providing templates which will allow you to be more or less aggressive in your spam blocking – more aggressive if you want a cleaner Inbox and less aggressive if you want to insure nothing is ever missed by accident.   You can also set up a “quarantine” which is like a server-side junk folder to hold email which our server thinks might be spam.   However, we recommend you only use this quarantine to perfect your rules so you no longer even have to check that folder.   Messages which are quarantined will automatically be removed by the server after 14 days.

Known Issues with Migration

We’ve been working hard to make the migration as seamless as possible and to minimize downtime.  However, with any large change like this, there will be some issues.  Some of those issues we know about and some will be unforeseen.  Issues we do know about are:

  1. Webmail-based address books aren’t going to automatically transfer over.  If you have a large address book stored in the webmail, please drop us a line at support@internetpro.net and we will move it for you.   Please let us know if the address book is stored in the webmail located at https://webmail.internetpro.net or the one at https://mail.internetpro.net (Legacy).
  2. There will be an increase in spam email when the server first comes online.   We have relaxed our spam rules so that we can address any delivery issues which may arise from the new server.  We will be tightening those rules again as soon as we are sure everything is running smoothly.   Please bear with us during this transition as it will be worth the trouble!


We will be continuing to post more updates and documentation as we get closer to the Go Live time, so please keep checking our website.


2014-12-08T18:07:25-06:00December 8, 2014|Documentation, Internet, News and Updates|Comments Off on New Email System

NetSol Cloud Desktop Client Updated

The desktop sync client for NetSol Cloud has been updated.  If you already had the latest client, you probably already know this as the client would have alerted you to the available update.  The update mechanism in this new version is improved and will do future updates automatically (depending on OS version).   See below for more details and for information on other changes:

  • [Feature] Provide information about the current connection’s encryption and SSL certificate chain in the account dialog
  • Handle Windows LNK files correctly  (these are shortcut icons)
  • Detect remove and renames in read only shared and restore removed files there
  • Preserve permissions of local files
  • Apply network limit changes to active sync run
  • Several bugfixes


For the autoupdater in the new version, see below for descriptions of the feature as pertaining to your operating system:

Windows

ownCloud client will check for updates and download the update if one is available. You can view the status under Settings -> General -> Updates. If an update is available and has been successfully downloaded, ownCloud Client will start a silent update prior to its next launch and then start itself. If the silent update fails, the client offers a manual download.

The user needs to be able to attain administrative privileges to successfully perform the update.

Mac OS X

If a new update is available, ownCloud client will ask the user to update to the latest version using a pop-up dialog. This is the default for Mac OS X applications which use the Sparkle framework.

Linux

Since distributions provide their own update tool, ownCloud Client on Linux will not perform any updates on its own. It will, however, check for the latest version and passively notify the user (Settings -> General -> Updates) if an update is available.

Preventing Auto Updates

In controlled environment such as companies or universities, the auto-update mechanism might not be desired as it interferes with controlled deployment tools and policies. In this case, it is possible to disable the auto-updater entirely:

Windows

There are two alternative approaches:

  1. In HKEY_LOCAL_MACHINE\Software\ownCloud\ownCloud, add a key skipUpdateCheck (of type DWORD) with the value 1 to the machine. This key can be manually overrideen by the same value in HKEY_CURRENT_USER.
  2. In HKEY_LOCAL_MACHINE\Software\Policies\ownCloud\ownCloud, add a key skipUpdateCheck (of type DWORD) with the value 1 to the machine. Setting the value here cannot be overridden by the user and is the preferred way to control the updater behavior via Group Policies.

Mac OS X

You can disable the update check via a system-wide .plist file located at /Library/Preferences/com.owncloud.desktopclient.plist. Add a new root level item of type bool and the name skipUpdateCheck and set it to true. You can also just copy the file owncloud.app/Contents/Resources/deny_autoupdate_com.owncloud.desktopclient.plist` to /Library/Preferences/com.owncloud.desktopclient.plist.

Linux

Since there is no updating functionality, there is no need to remove the check. If you want to disable the check nontheless, open a file called /etc/ownCloud/ownCloud.conf and add the following content:

[General]
skipUpdateCheck=true
2014-03-27T16:42:19-05:00February 14, 2014|Documentation, NetSol Cloud, News and Updates|Comments Off on NetSol Cloud Desktop Client Updated

Mapping NetSol Cloud on Windows 7 or 8

Frequently, people want to access their cloud storage through a mapped drive letter just like they might do a server drive on a local network.  This tutorial will help guide you on mapping a drive letter in Windows 7 and 8 (also 8.1).

There are some limitations with the WebDAV support in Windows, so it is a bit of a chore to make this work.  Once it does, however, you should be set for good.  If you have trouble, please contact us at support@internetpro.net so our technicians can give you help.

1.) Download and install the Microsoft update KB90730 – Web Folders: http://www.microsoft.com/download/en/details.aspx?displaylang=en&id=15123

2.) Modify the Windows registry, this will enable Windows to accept basic authentication for SSL and non-SSL shares.
We have provided a registry key HERE which will do this automatically for you. (Just download and run that key) Or, you can do it manually following these instructions (skip to step 3 if you use our automatic key)


2a) Start > Search > Type: regedit > Select regedit
2b) The registry key of interest to find is: HKEY_LOCAL_MACHINE\SYSTEM\CurrentControlSet\Services\WebClient\Parameters
2c) Select BasicAuthLevel (if it does not exist, create the key)
2d) Change the value to 2.  Select OK > File > Exit


3) Reboot Windows


4) Map the WebDav folder as a network drive  (Note: This procedure sometimes does not work. If it fails, proceed to step 5)
4a) Using Windows Explorer Select  Computer > Select Map Network Drive.
4b) Choose the drive letter you would like to map
4c) In the Folder blank, use https://cloud.internetpro.net/netsol/remote.php/webdav
4d) Place a check mark next to “Reconnect at logon” and “Connect using different credentials” and hit Finish.  If it maps, you should be good to go and you can stop here.


5) If step 4 did not work, follow these instructions to create a batch file to map the drive for you.
5a) Download the batch file HERE.  Save the file.
5b) Edit the batch file by right clicking the file and choosing Edit.
5c) Change “N:” to whatever drive letter you want to use.  Replace “username” with your NetSol Cloud username and “password” with your NetSol Cloud password
5d) Save and exit the file.
5e) To test the file, double click on it.  The drive letter should map correctly.  Click on Start > Computer to verify a mapped drive is present.
5f) Now, right click the file and choose Cut.
5g) Click Start > All Programs.
5h) Right Click on Startup and choose Open  (not Open All Users)
5i) A new window will open.  Right click inside that window and choose Paste.  The netsolcloud.bat file should be placed in that window.


6) Reboot windows and confirm that your mapped drive is still present.
NOTE:  We have seen cases where antivirus and/or antispyware software prevents batch files from running on startup.  If this is the case, you may have to contact your antivirus vendor to find out how to add an exception.  Alternatively, you can leave the netsolcloud.bat file on your desktop and click it manually when logging in to reconnect your mapped drive to NetSol Cloud.
2014-01-03T18:45:38-06:00January 3, 2014|Documentation, FAQ, NetSol Cloud|Comments Off on Mapping NetSol Cloud on Windows 7 or 8

IMAP issues in Outlook 2013 and Office 365

It has come to our attention that many Outlook 2013 and Office 365 users are having issues within synchronizing IMAP folders recently. This appears to be happening across all hosts due to a recent update that Microsoft has pushed out to all of its users.

What causes the issue?

This issue is caused by installing one of the following updates that have been pushed out by Microsoft on 11/12/13:

KB2837618 or KB2837643

If you have not already done so, please avoid this update for a bit until Microsoft corrects the issue. If you cannot avoid the update, we will provide you with further steps regarding a temporary fix for the issue.

What does this issue affect?

This issue with Microsoft Outlook 2013 and Office 365 will cause IMAP folders to not successfully synchronize, therefore inhibit your ability to receive new mail to your inbox.  Restarting Outlook temporarily fixes the issue.

How do I fix this issue?

There are a few ways to resolve the issue:

Option 1) Uninstall the recent updates (KB2837618 or KB2837643)

One option is to remove the recent update that has been pushed out by Microsoft to Outlook 2013 and Office 365 users. To do so, complete the following steps:

  1. Open your Start menu and click visit your Control Panel.
  2. Click Programs and Features
  3. Click View Installed Updates
  4. Locate either the KB2837618 or KB2837643 updates and remove them.

Option 2) Disable the “Show only subscribed folders” option in Outlook

There have been reports that the problem can also be resolved by removing the setting that states to show only subscribed folders in Outlook. To do so, complete the following steps:

  1. Under the “Folder” tab, right of the “Favorites” tab, click “IMAP Folders”
  2. Outlook should open a dialog box with IMAP folders.
  3. There is a checkbox that says, “When displaying hierarchy in Outlook, show only the subscribed folders.” Uncheck that box.
  4. Force sending/receiving within Outlook and everything should synchronize up properly.

Option 3) Changing the root folder path

Visit your Account Settings, then Advanced for the mail account that you are having trouble with. This can be located at one of the following:

  1. Go to Change Account>More Settings>Advanced Tab
  2. File>Account Settings>Account settings>Change…>More Settings…>Advanced
  3. In the Folders option, look for “Root folder path” and enter “Inbox”.
  4. Save your settings and force a Send/Receive


2013-11-25T17:30:46-06:00November 25, 2013|Documentation, FAQ, News and Updates|Comments Off on IMAP issues in Outlook 2013 and Office 365

Changing Email Settings (Domain Administration)

These are the instructions for administrating email accounts for a domain .  If you need to change individual email account settings, use these instructions instead.

Using our control panel, you can easily update settings for your domain such as adding users, forwards, autoresponders, or mailing lists.  You can also change passwords and quotas for individual users as well as making other changes.  For most customers, our support team handles these tasks, but some like a more “hands on approach” and these instructions will help guide those users.

To get started, go to our home page at https://www.netsolinc.com.  On the right side, you will find the “Online Email Center”. Click on the link that says “Modify Email Account Settings” or you can go directly to https://mail.internetpro.net/cgi-bin/qmailadmin.   Once you have gone to the control panel address, you will find a screen with login information.   The User Account field will already be filled in with “postmaster”.  The postmaster account is the master account for the domain and logging in with that user allows you to modify any settings available for that domain.  You will fill in your domain int he Domain Name field (for example, if your email addresses are @internetpro.net, you would put internetpro.net in that blank).  Next, fill in your postmaster password.   By default we do not assign a postmaster password to customers.  If you do not have this, and wish to do your own email administration, please contact us a support@internetpro.net or 877-886-6868 to have a password set.

Once you log in, you will be presented with a menu of available settings. The Email Accounts link will allow you to create and modify email accounts for your domain.  Forwards are email addresses which are delivered to another email address (for example, you may have a billing@youdomain.com that you want forwarded to a particular person).  Mail Robots are autoresponders which will respond with a predetermined email message (for example, directions@yourdomain.com could respond with an email giving driving directions to your location).  Mailing Lists are created to allow you to send mass emails to subscribers and to manage the subscribers on your list.

If you have any trouble accessing these settings or making changes, please contact our support team at support@internetpro.net or 877-886-6868.


2012-11-05T15:59:06-06:00November 5, 2012|Documentation|Comments Off on Changing Email Settings (Domain Administration)

Changing Email Settings (Single Account)

These instructions have been deprecated as of 12/9/2014.    We will be replacing this page soon with updated instructions.


These are the instructions for changing settings on a single email account.  If you need to administrate the settings for an entire domain name, use these instructions instead.

Using our control panel, you can easily update settings for your email account such as changing your password, forwarding your email to someone else, or setting up an autoresponder (vacation message) for when you are away from email.

To get started, go to our home page at https://www.netsolinc.com.  On the right side, you will find the “Online Email Center”. Click on the link that says “Modify Email Account Settings” or you can go directly to https://mail.internetpro.net/cgi-bin/qmailadmin.   Once you have gone to the control panel address, you will find a screen with login information.   You will want to remove “postmaster” in the User Account field and replace it with the first part of your email address (the part before the @).  For example, if your email address was support@internetpro.net, you would replace postmaster with support.  In the domain name field, put the second part of your email address (the part after the @).  In our example of support@internetpro.net, this would be internetpro.net. Use your current password for the password field.

Once you log in, you will be presented with a screen which will allow you to change various settings.  After you have input a new setting, just click the “Modify User” button at the bottom to save the changes.  Note: The “Spam Detection” check mark is NOT needed unless you are doing server-side spam filtering.  Server-side filtering is not typically needed unless your IMAP program does not support filtering (like Outlook Express) or you need to block emails coming to a mobile device.

If you have any trouble accessing these settings or making changes, please contact our support team at support@internetpro.net or 877-886-6868.


2014-12-11T16:37:48-06:00November 5, 2012|Documentation|Comments Off on Changing Email Settings (Single Account)

Desktop Client Sync Documentation for NetSol Cloud

This documentation will show you how to install and use the desktop sync software for NetSol Cloud.  There are versions for Windows, Linux, and Mac.  This document will focus on Windows, but use of the program is the same on all platforms.  Installation will vary somewhat, but the sync software will install just like any other software package on your platform of choice.

1) First, download the client sync software.
2) Run the installer.  Hit Next twice to take the defaults and then hit Install.  Hit Next again and then Finish.
3) The client will automatically run. You may get a popup warning about no connection being configured yet. Just hit OK to clear that message.
4) The client software runs in the systray next to the clock in Windows.  You will see a little cloud icon. Click it once to get the initial connection creation screen.
5) In the blank, enter your cloud URL (This is https://cloud.internetpro.net/netsol for users of the NetSol Cloud personal.  For Business or Enterprise users, the address will be different).
6) Hit Next and on the next screen, enter your username and password.  These are the same user/pass you use to log into the NetSol Cloud web interface. Do not put a check in the box.
7) Hit Next and you will get some messages related to the setup of the client.
8 ) Hit Finish.

At this point, the software is installed.  The wizard will disappear, but the client icon will still be visible in the systray.   By default, the client creates a folder called ownCloud in your user profile and it creates a clientsync folder on your cloud.  The ownCloud and clientsync folders are set up to syncronize.

If you would like to add other folders to sync, simply click the cloud icon in the systray.  A new window will appear.  Hit the “Add Sync…” button.
Choose the folder you would like to sync and give it a descriptive name (alias).
Hit Next.  Make sure you have a dot next to the first choice (to your ownCloud) and fill in the blank for the folder.  This name will be the folder name on your cloud. It can be the same as the folder name on your computer, but it does not have to be.
Hit Finish, and you will be taken to a screen which will show you the status of the sync.   You can close the window at this time and the files will sync in the background.


NOTE: The sync software does a complete synchronization. If you delete a file from a synced folder, the file will be removed from the cloud and from any other computers which are also syncing that folder.


2012-06-12T17:52:06-05:00June 12, 2012|Documentation, FAQ, NetSol Cloud|Comments Off on Desktop Client Sync Documentation for NetSol Cloud
Go to Top